Battery Backup Design

General Discussion on any topic relating to CPAP and/or Sleep Apnea.
User avatar
JohnBFisher
Posts: 3821
Joined: Wed Oct 14, 2009 6:33 am

Battery Backup Design

Post by JohnBFisher » Tue Feb 09, 2010 11:45 pm

The following battery backup design is under edit. I will continue to edit it here until it is complete. At that time, I will move it into the Wiki. However, I thought you might enjoy seeing it come together. It might help those of you who want to put together a battery backup setup. And of course, I welcome input, though remember - I am sharing what I've done over the years - not a generic approach. But I am trying to make it generic enough for everyone else to pick up and use.


Introduction

Objectives

First, with this setup, if you know there is a possibility power may be interrupted, you can plug into this setup and use the battery. If power goes out, the setup is such that your xPAP unit can continue uninterrupted. When power is restored, the battery tender will gradually recharge the battery to full capacity.

Second, the design is fairly modular to allow you to customize this. You can keep it simple, or go a bit more complicated and make it sturdier.

Third, this is designed to stay in the bedroom. No need to drag the battery in and out of the house. But it is also designed to allow you to make it so little fingers won't be hurt with this setup.

Special Features

This setup allows you to use a modular approach to the power setup. You can choose your battery size. You can choose amount the battery tender options. You choose the shared use option. Make it as simple or as sturdy as you need. You can choose the DC to xPAP hookup. Choose the options to suit your needs. This approach means you can configure this to meet your needs. Additionally with this type of setup, it will help the battery last longer than if it is stored without the "float" charge, which keeps the battery charged and ready to use.

Note about Web sites

I have no affiliation with any of the web sites. I selected and used these products to make this setup for myself. Feel free to tinker and adapt it as you see fit.

Note about the application

I researched this as best as possible. I've used deep cycle batteries and an inverter for the past 10 years. However, this is the first setup I designed to stay indoors to provide continuous power. Though it should work and others will help improve the design, please understand if you use this design, you will do so at your own risk. (But it should work for you, if you follow the directions).

Note about the construction

By making this a modular design, you can either do some minor customization, or use a simpler approach to connect the components. I took an approach that does a good job of anchoring all the pieces. The advantage of this is that no parts will accidentally short. Nor will it allow little fingers to accidentally be hurt.

Note about humidifier use

Humidifiers consume a lot of power. ResMed humidifiers require pure sine wave inverters, which are both more expensive and use much more power. Thus, this design is primarily intended to be used without a humidifier. The humdifier can be attached, but turned off. It will then function as a "passover" humidifier.

Shopping List
  1. Battery
  2. Battery Tender
  3. Battery Box
  4. Shared Use Connector
  5. Marine Terminal Coversion & Covers
  6. DC to xPAP Hookup

Sections
  1. Introduction
  2. Warnings and Disclaimer
  3. Checklist - How to determine YOUR needs & What to shop for
  4. Battery - To Complete (Add Portable Batteries, Add UPS Info, Add Calculation Info)
  5. Battery Tender - Add pointers to other options
  6. Battery Box - Add Safety Issues for Placement
  7. Shared Use Connector - Possible Options
  8. Marine Terminal Coversion & Covers - Pictures
  9. DC to xPAP Hookup - Include Different Machine DC options

Continued to Part 2 (Battery)

_________________
Mask: Quattro™ FX Full Face CPAP Mask with Headgear
Additional Comments: User of xPAP therapy for over 20 yrs. Resmed & Respironics ASV units with EEP=9cm-14cm H2O; PSmin=4cm H2O; PSmax=15cm H2O; Max=25cm H2O
Last edited by JohnBFisher on Fri Feb 12, 2010 7:46 pm, edited 3 times in total.
"I get up. I walk. I fall down. Meanwhile, I keep dancing” from Rabbi Hillel
"I wish to paint in such a manner as if I were photographing dreams." from Zdzisław Beksiński

User avatar
rested gal
Posts: 12883
Joined: Thu Sep 09, 2004 10:14 pm
Location: Tennessee

Re: Battery Backup Design

Post by rested gal » Wed Feb 10, 2010 12:14 am

Very well organized and written, John.

When you get it finished, that will be very handy info for CPAP users.

Thanks for letting us see your work-in-progress!
ResMed S9 VPAP Auto (ASV)
Humidifier: Integrated + Climate Control hose
Mask: Aeiomed Headrest (deconstructed, with homemade straps
3M painters tape over mouth
ALL LINKS by rested gal:
viewtopic.php?t=17435

User avatar
JohnBFisher
Posts: 3821
Joined: Wed Oct 14, 2009 6:33 am

Battery Backup Design - Part 2

Post by JohnBFisher » Wed Feb 10, 2010 12:15 am

Battery

Deep Cycle Battery

Of course at the core of the unit is the deep cycle battery. There are many options of battery that can be used. I recommend the following links to provide an excellent FAQs for batteries:

http://www.windsun.com/Batteries/Battery_FAQ.htm
http://www.batterystuff.com/tutorial_battery.html

ResMed also provides a Battery Guide for their flow generators. It also includes some basic information about batteries. It is well written and easy to understand.

Why use a Deep Cycle battery? To quote from the WindSun website (above):
... Deep cycle batteries are designed to be discharged down as much as 80% time after time, and have much thicker plates. The major difference between a true deep cycle battery and others is that the plates are SOLID Lead plates - not sponge. This gives less surface area, thus less "instant" power like starting batteries need. Although these an be cycled down to 20% charge, the best lifespan vs cost method is to keep the average cycle at about 50% discharge. ...
So, the deep cycle battery can last 4 to 8 years and be reused over and over and over.

Other choices include AGM deep cycle batteries and Gelled deep cycle batteries. From my research I found that a standard deep cycle battery provided the best price performance. As I noted, I've used one for about the past 10 to 15 years without problem, so I am sticking to that for this design. That is, during the past 10 to 15 years I used two different deep cycle batteries. I just purchased my third. So, the design works well and lasts a long time.

Note: It is best to purchase a sealed, maintenace free deep cycle battery.

What about UPS units? Well, they can be an option. Some xPAP units require more power than most UPS units provide. Larger UPS units (though more expensive) can be used to power more current xPAP units.

What about portable batteries? These certainly can also be used. However, the cost of those batteries are prohibitive for the power requirements of my ASV unit. Thus, I selected a deep cycle battery to keep my unit going for a couple nights.

What about car batteries? Standard car batteries should NOT be used. They typically are designed to provide a quick boost of energy to start an engine (cold cranking amps), instead of being designed for deep cycle operations. A deep cycle will often ruin such batteries after one or two times they are used.

How much power do I need? ResMed provides a handy Battery Guide to help understand how to hook up and use battery backup for your ResMed unit.

ResMed Battery Guide

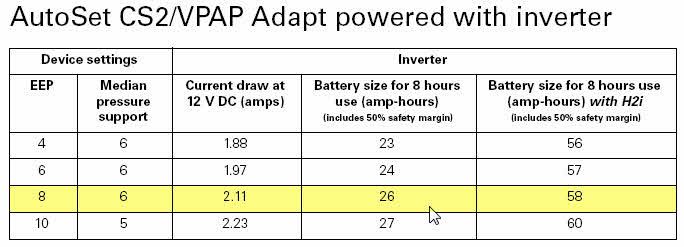
For instance, I use a ResMed VPAP Adapt SV Enhanced unit. To use this unit without a humidifier, I need to use a modified sine wave Inverter. That inverter must provide at least 150W sustained output. If I use a humidifer with my ASV unit, I need to use a pure sine wave inverter with at least 300W sustained output and upto 500W peak output. See page 7 of the battery guide for more information.

Then based on the pressure setting of my unit, I can determine the size of the battery that I need. On page 13 there is a table titled "AutoSet CS2/VPAP Adapt powered with inverter". My unit uses an ending exhalation pressure (EEP) of 7. To be conservative, I will choose 8 from the table. So, to last 8 hours WITHOUT a humidifier, my unit needs upto 26 amp-hours. To last 8 hours WITH a humidifier, my unit needs upto 58 amp-hours:

Image

How long will power be out? In my area the power rarely is out more than 2 days. In fact, most of the time power is out only for a few hours. However, 2 days provides enough leeway to handle most emergencies.

So, with 2 nights of service but without a humidifier, I will need over 52 amp-hours (AH) from a deep cycle battery. Thus, I purchased a deep cycle battery rated at 55 amp-hours.

What if I had a ResMed S8 AutoSet Spirit II?

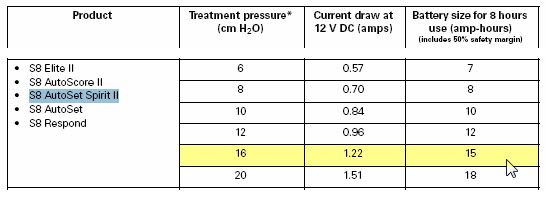
In that case, I probably would want to use a DC Converter. If my average treatement pressure was 16, then per the ResMed Battery Guide on page 15, it indicates I would need only 15 amp-hours to run the unit for 8 hours.

Image

So, to last two nights, I would need a deep cycle battery rated for 30 amp-hours.

What about other units?

Other units by other manufacturers require a little more calculation. ...*** To Be Completed ***...

Where to purchase a deep cycle battery?

I found my deep cycle battery at Batteries Plus. You can also find them at many automotive stores as well as Sears and other stores with automotive departments. Be careful that you purchase a battery that is a deep cycle battery. Rembmer that in this case, cheaper is probably going to be just that - cheaper. It is worth paying more for a battery that will last longer and not die in the middle of a power outage.


Continued to Part 3 (Battery Tender)

_________________
Mask: Quattro™ FX Full Face CPAP Mask with Headgear
Additional Comments: User of xPAP therapy for over 20 yrs. Resmed & Respironics ASV units with EEP=9cm-14cm H2O; PSmin=4cm H2O; PSmax=15cm H2O; Max=25cm H2O
Last edited by JohnBFisher on Wed Feb 10, 2010 3:22 am, edited 7 times in total.
"I get up. I walk. I fall down. Meanwhile, I keep dancing” from Rabbi Hillel
"I wish to paint in such a manner as if I were photographing dreams." from Zdzisław Beksiński

User avatar
JohnBFisher
Posts: 3821
Joined: Wed Oct 14, 2009 6:33 am

Battery Backup Design - Part 3

Post by JohnBFisher » Wed Feb 10, 2010 12:16 am

Battery Tender

With standard lead acid batteries and especially deep cycle batteries that are only periodically used, it is important to keep them charged to maintain their chemistry and charge. If left uncharged for a prolonged period of time it irrevocably damanges the battery.

To maintain this charge, you can periodically maintain the charge. For example, once a month charge the battery. However, if time elapses and the battery is not charged, damage can be done.

It is possible to maintain a trickle charger. However, unless it is designed to stop charging the battery, if left on too long a trickle charger can over charge a battery and thus permanently damage a battery.

Instead, the easiest and best way to maintain the charge on a battery is to use a Float Charger. This maintains the charge on the battery, but stops charging once it senses the battery is fully charged. For more information on trickle and float chargers, see:

http://en.wikipedia.org/wiki/Trickle_charging

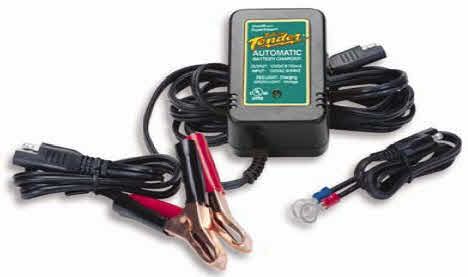
Though others are available, I chose the Battery Tender Jr. charger:

Image

It is available at:

http://www.batterytender.com/

Since I only rarely see power outages, the Battery Tender Jr delivers an adequate charge rate to maintain my battery. If you anticipate you will use the battery more frequently, or want to always remain plugged into the battery backup unit, then a more powerful Battery Tender unit will be needed.

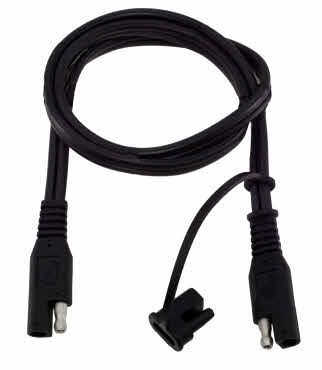
Additionally, one of the advantages of the Battery Tender models is that they use the SAE automotive connectors. So, you can easily add an extension cord to the unit, such as those found at Powerlet.com:

Image


Continued to Part 4 (Battery Box)

_________________
Mask: Quattro™ FX Full Face CPAP Mask with Headgear
Additional Comments: User of xPAP therapy for over 20 yrs. Resmed & Respironics ASV units with EEP=9cm-14cm H2O; PSmin=4cm H2O; PSmax=15cm H2O; Max=25cm H2O
Last edited by JohnBFisher on Wed Feb 10, 2010 12:59 am, edited 3 times in total.
"I get up. I walk. I fall down. Meanwhile, I keep dancing” from Rabbi Hillel
"I wish to paint in such a manner as if I were photographing dreams." from Zdzisław Beksiński

User avatar
JohnBFisher
Posts: 3821
Joined: Wed Oct 14, 2009 6:33 am

Battery Backup Design - Part 4

Post by JohnBFisher » Wed Feb 10, 2010 12:17 am

Battery Box

There are several key disadvantages to batteries in the bedroom.

First, one of the disadvantages of lead acid batteries is that they do contain acid! Even sealed batteries can leak. That's certainly not somethng that I want uncontained within my bedroom.

Second, it is possible pets and/or little fingers might want to explore the battery. These batteries contain a good deal of power and might hurt those naive, inquisitive fingers and noses. So, sealed and protected makes the most sense for a battery in the bedroom.

Finally, though it probably won't occur, left uncovered and unsealed, it is possible clamps may be knocked off of the battery. Again, this can damage the battery and possibly cause other problems.

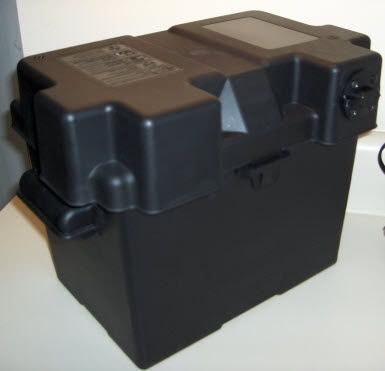
For for all three reasons an ounce of prevention is worth a pound of cure! And to do this, I chose a plastic battery box, such as the following image:

Image

It was available at the Batteries Plus store, where I purchased the battery and the Battery Tender Jr.

I also specifically chose a flat top to allow me to modify the top to make it that much more modular than with the rounded top.


Continued to Part 5 (Shared Use Connector)

_________________
Mask: Quattro™ FX Full Face CPAP Mask with Headgear
Additional Comments: User of xPAP therapy for over 20 yrs. Resmed & Respironics ASV units with EEP=9cm-14cm H2O; PSmin=4cm H2O; PSmax=15cm H2O; Max=25cm H2O
Last edited by JohnBFisher on Wed Feb 10, 2010 1:12 am, edited 3 times in total.
"I get up. I walk. I fall down. Meanwhile, I keep dancing” from Rabbi Hillel
"I wish to paint in such a manner as if I were photographing dreams." from Zdzisław Beksiński

User avatar
JohnBFisher
Posts: 3821
Joined: Wed Oct 14, 2009 6:33 am

Battery Backup Design - Part 5

Post by JohnBFisher » Wed Feb 10, 2010 12:18 am

Shared Use Connector

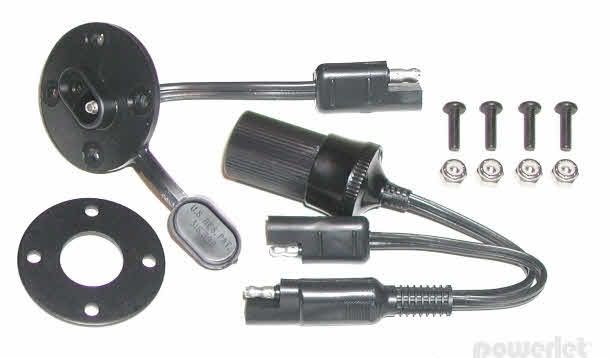
The secret to this design is the shared use connector. That is, at the same time you charge the battery, the battery can also be connected to an inverter. To do this, you have one of two options. I decided to modify the Battery Box and provide a connector that was securely anchored to the battery. I did not want a loose wire to result in a clamp being pulled loose from the battery. However, it is also reasonable to just use a Y connector.

These SAE connectors are available at Powerlet.com. The model I chose was the "Luggage Electrix Connector and Cigarette Socket". The model number is PTB-003. Though this is more expensive, as the image shows, it is firmly connected to the battery box.

Image

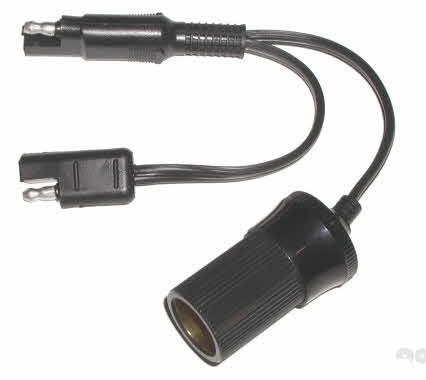
However, the Y connector only is also available:

Image

As you can see from the completed battery box, the connector between the battery minder and Y cable is very sturdy and unobtrusive. Wires hanging all over the place is not a good choice for me (due to incoordination). Many others might prefer this, especially if children or animals might tug on the wiring.

I used a drill and a bit to drill the holes for the bolts. I also used a drill with a bit to drill holes to drill the center opening in the battery box. This seemed to be the easiest approach to create the openings in the side of the Battery Box.

First is the modified box with the connector installed.

Image

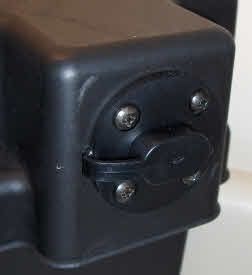
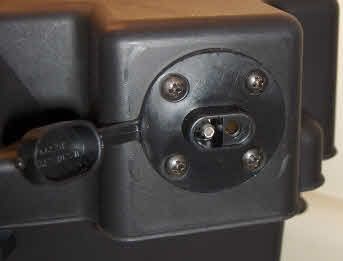
Next is a close up picture of the connector. It can be closed for easy and safe transportation, such as to take the battery car camping (if power if not readily available at the camp site).

Image

Finally, the connector can be opened and the Y Cable (the shared use connection cable) can be inserted into the connector.

Image

On the inside, the connector is firmly bolted to the battery box cover. The highlighted area shows that it presents the same connector as the end of the cable that leads from the battery tender. Thus, it can connect to either the battery clamp or the battery ring terminal harness. Either of those can then connect to the battery.

Image


Continued to Part 6 (Marine Terminal Conversion & Covers)

_________________
Mask: Quattro™ FX Full Face CPAP Mask with Headgear
Additional Comments: User of xPAP therapy for over 20 yrs. Resmed & Respironics ASV units with EEP=9cm-14cm H2O; PSmin=4cm H2O; PSmax=15cm H2O; Max=25cm H2O
Last edited by JohnBFisher on Wed Feb 10, 2010 2:54 pm, edited 5 times in total.
"I get up. I walk. I fall down. Meanwhile, I keep dancing” from Rabbi Hillel
"I wish to paint in such a manner as if I were photographing dreams." from Zdzisław Beksiński

User avatar
JohnBFisher
Posts: 3821
Joined: Wed Oct 14, 2009 6:33 am

Battery Backup Design - Part 6

Post by JohnBFisher » Wed Feb 10, 2010 12:19 am

Marine Terminal Conversion & Covers

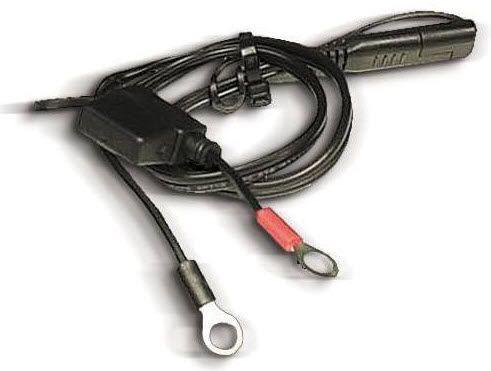
Finally, to keep the battery connections as secure as possible, it is important to shift form the battery clamps to a battery post to terminal conversion. This conversion unit connects in a similar manner to most automobile battery connectors. However, instead of a cable coming form the battery post, it provides a terminal, onto which the Ring Terminal Harness of the Battery Tender can be attached. The Ring Terminal Harness looks like this:

Image

The inside diameter of the ring terminals is 3/8". To connect that to the battery post, we need a 3/8" terminal. To provide the terminal, I chose the "Battery post marine conversions by Quick Cable". It is available at SolarSeller.com The battery post conversion looks like:

Image

You need two of the positive conversion adpaters, which has a 3/8" threaded steel terminal and wing nut. The part number from this company is # 5516 P.

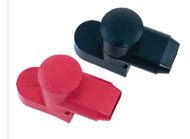
Then to "cap it off" a set of covers for these marine terminals will help ascertain nothing interferes with the battery connections. The covers are available at SolarSeller.com. The type I chose was the "Marine Terminal Cover - Swivel Type". I purchased a pair (one positive - red, and one negative - black).

Image

While we are talking about preparing the battery for a long term without any interaction, it's best to also prevent corrosion of the cable clamps. Though the sealed, maintenace free battery will help, the following suggestion from BatteryStuff.com will help avoid issues:
To prevent corrosion of cables on top post batteries use a small bead of silicon sealer at the base of the post and place a felt battery washer over it. Coat the washer with high temperature grease or petroleum jelly (Vaseline), then place cable on the post and tighten. Coat the exposed cable end with the grease.
The following image provides an example of the top post washers I will use:

Image

Some other URLs for sources include:

http://www.vteworld.com/content/electro ... 516_17.php
http://www.vteworld.com/content/termins ... esPage.php


Continued to Part 7 (DC to xPAP Hookup)

_________________
Mask: Quattro™ FX Full Face CPAP Mask with Headgear
Additional Comments: User of xPAP therapy for over 20 yrs. Resmed & Respironics ASV units with EEP=9cm-14cm H2O; PSmin=4cm H2O; PSmax=15cm H2O; Max=25cm H2O
Last edited by JohnBFisher on Wed Feb 10, 2010 3:31 am, edited 6 times in total.
"I get up. I walk. I fall down. Meanwhile, I keep dancing” from Rabbi Hillel
"I wish to paint in such a manner as if I were photographing dreams." from Zdzisław Beksiński

User avatar
JohnBFisher
Posts: 3821
Joined: Wed Oct 14, 2009 6:33 am

Battery Backup Design - Part 7

Post by JohnBFisher » Wed Feb 10, 2010 12:19 am

DC to xPAP Hookup

What's the difference between Direct DC connection, a DC converter, and an Inverter?

Direct DC Connection - Some units can accept 12V DC input. Those use a direct DC connection. For example, my old Respironics BiPAP Auto (M Series) unit, accepted a DC input cable. Using a picture from CPAP.com, you can see it plugs into the car cigarette lighter (also known as a power port, since many can no longer function as a cigarette lighter!) and then into the back of the BiPAP unit.

Image

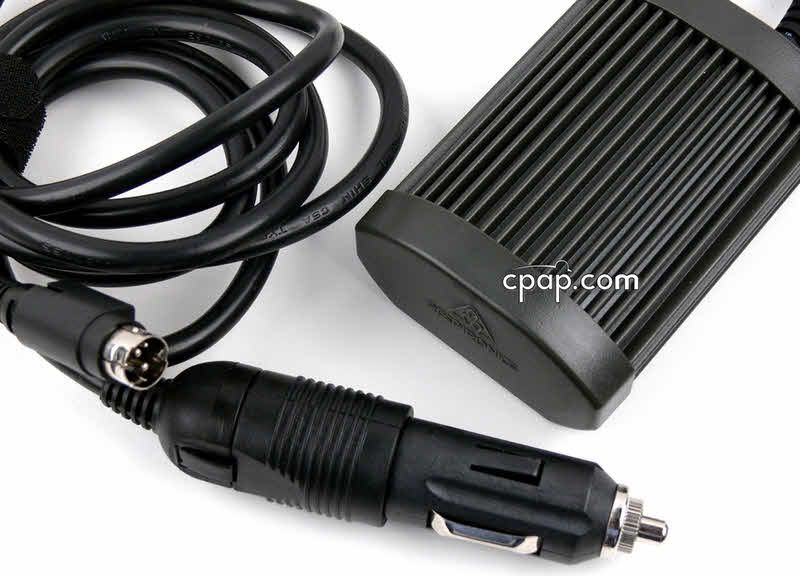
DC Converters - But some units, such as the Respironics BiPAP AutoSV unit requires a DC converter. Why convert the DC power? Well, some units use 24V DC power input, instead of the 12V DC power provided by most cars or deep cycle batteries. So, to condition the power (avoid power fluctuation and drops) and bump the voltage from 12V DC to 24V DC, a DC converter is used. Using a picture from CPAP.com, you can see it also plugs into a car cigarette lighter/power port on one end and a different connector is used to plug into the back of the BiPAP AutoSV unit.

Image

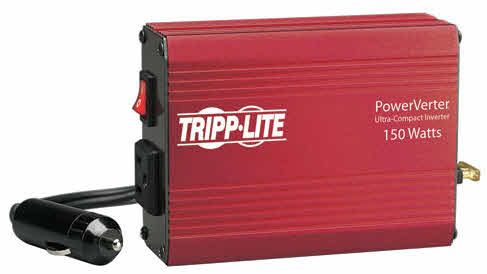
Modified Sine Wave Inverter - An inverter converts from DC to AC voltages. Typically, this goes from 12V DC to 120V AC. As an example, at the Tripp Lite web site, there is an inverter that provides 150W sustained output (using a modified sine wave). It also has a cigarette ligher/power port adapter at one end but an AC plug adapter at the other end:

Image

Such a device allows any xPAP unit to be plugged into a cigarette lighter/power port. But the down side of such a unit is that it does use more power than a straight DC connection or DC to DC conversion.

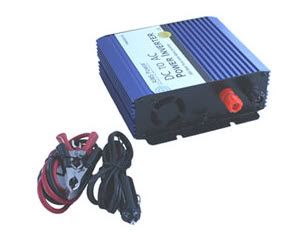
Pure Sine Wave Inverter - In addition to the modified sine wave inverter, a pure sine wave inverter is also available. Also from CPAP.com, the following picture shows an example of a pure sine wave inverter (300W sustained output). Note that the inverter uses a much more cumbersome connection method than the modified sine wave inverter.

Image


Continued to Part 8 (Completed Setup)

_________________
Mask: Quattro™ FX Full Face CPAP Mask with Headgear
Additional Comments: User of xPAP therapy for over 20 yrs. Resmed & Respironics ASV units with EEP=9cm-14cm H2O; PSmin=4cm H2O; PSmax=15cm H2O; Max=25cm H2O
Last edited by JohnBFisher on Wed Feb 10, 2010 2:47 am, edited 1 time in total.
"I get up. I walk. I fall down. Meanwhile, I keep dancing” from Rabbi Hillel
"I wish to paint in such a manner as if I were photographing dreams." from Zdzisław Beksiński

User avatar
Marietjie
Posts: 572
Joined: Tue May 13, 2008 7:30 am
Location: Port Elizabeth, South Africa

Re: Battery Backup Design

Post by Marietjie » Wed Feb 10, 2010 2:02 am

Gee, John - didn't I mention it before? - You are a Star !
I can't wait for my husband to get back from town and show him your design. Thank you so much
Best among people are those who benefit mankind

User avatar
JohnBFisher
Posts: 3821
Joined: Wed Oct 14, 2009 6:33 am

Battery Backup Design - Part 8

Post by JohnBFisher » Wed Feb 10, 2010 2:52 am

Completed Setup

What is really needed?

The least that I recommend is:
  • Battery
  • Battery Tender
  • Battery Box
  • Shared Use Connection
  • DC to xPAP Connection
Of course the battery, and battery tender (and even the battery box) are sized to your power requirements. The Shared Use Connection is not strictly needed, but allows you to plug in and use your xPAP unit without the need to unplug. The basic design assumes a heated humidifier is not used. Of course, if you purchase a large enough battery and appropriate DC to xPAP connection, then even a heated humidifier can be used. The beauty of the design is that it will just keep working, even if your power to the house fails during your sleep.

The DC to xPAP connection is needed and is based upon your specific xPAP unit:

Some, such as Respironics, allow a direct DC connection. This is cheaper and uses the least amount of power, thus decreases the size of the deep cycle battery required. This means a smaller, lighter and less expensive battery will work for such a setup.

Other units, such as many of the ResMed S8 units, can use a DC to DC converter. This converter is designed to regulate the power from the battery, which can vary over time and use. It also can be used to convert from one voltage level to another, such as 12V DC to 24V DC. Though not as efficient as a direct DC connection, it does use less power than a modified sine wave inverter and much less power than a pure sine wave inverter. Additionally, since the DC converter helps condition power, it also helps better protect your xPAP unit.

Some units, such as the Resmed VPAP Adapt SV units require an inverter to operate. Though a little less efficient than a direct DC connection or a DC converter, a modified sine wave inverter does not require excessive overhead power to operate. This also allows the greatest flexibility for connecting other devices.

Finally, some units, whether by design or due to the added use of a heated humidifer, require a pure sine wave inverter. Between the added load of the humidifier and the pure sine wave inverter, these units require almost twice the battery power of a modified sine wave inverter. However, this will allow a user to continue to use the heated humidifer, even if the power fails. This could be very important in either very dry climates or very cold weather conditions.


This section shows pictures of the completed setup

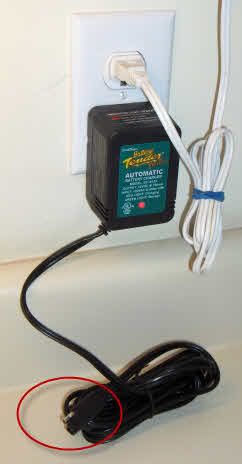
Here's the Battery Tender Jr. plugged into an outlet. Note the end of the cable. This SAE automotive connector allows different cable ends to be attached. This allows me to use the Shared Use Connection cable (a Y cable). Thus, both the inverter and the battery tender can be connected to the same battery at the same time.
Image

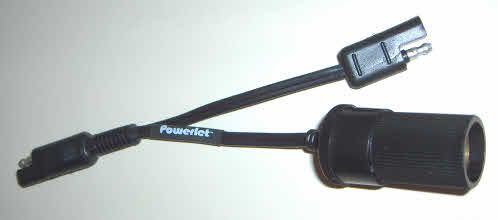
This then plugs into the matching SAE automotive connector (to the right on the picture below) of the shared use cable.
Image

This SAE automotive connector to the left of the Y cable (on the picture below) then plugs into the power outlet on the battery box. The cigarette lighter / power port is where the inverter will connect.
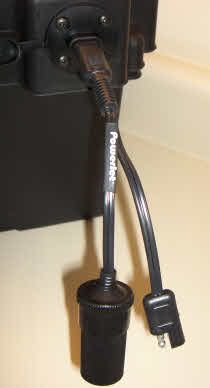
Image

And here they are connected together. The cigarette lighter / power port is ready for the inverter. They can be connected and used at the same time in this configuration.
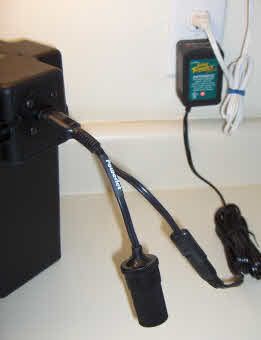
Image

Next, let's look inside the battery box. You will notice, inside the box (in the highlighted area) the same connector is present. Thus, though from different companies, by using the same SAE automotive connector, we can add the battery box access and/or the shared use cable to the battery tender product.

Here's the connector on the inside of the battery box. Note the same SAE connector as the Battery Tendor cable.
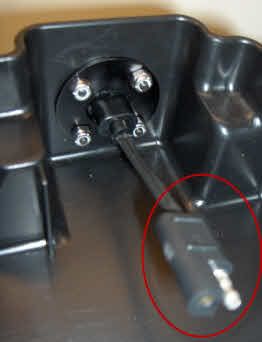
Image

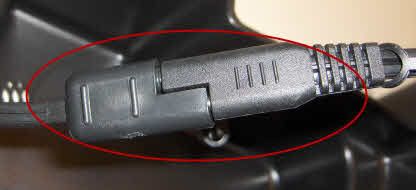
This connects to the portion of cable from the battery tender product that connects to the battery. Note how the SAE connectors fit together.
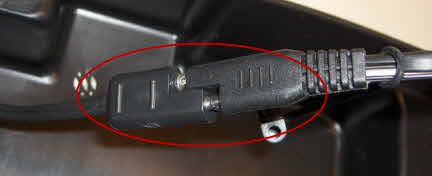
Image

Though the cables fit together snugly, they are note (nor are they intended to be) water tight. Instead, they fit together well enough to not come apart easily. Thus they will stay secure even if the battery box is bumped about a bit.
Image

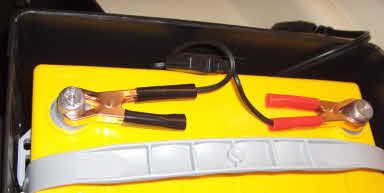
Finally, the other end of that cable is attached to the battery posts. This cable uses battery clamps to connect to the battery. Remember, Red is Positive. Black (or any other color) is Negative. The posts are marked with either a plus [ + ] or a minus [ - ] for positive or negative.
Image

When I receive the battery post to marine terminal conversion clamps and the covers for them, I will take more pictures. In the long run that approach will provide less problems. Due to corrosion and vibrations, over the course of the next 5 to 8 years the battery clamps may fail to provide a strong connection. The clamps offer a better long term solution.

- - - - - - - - - - - - - - - - - - -

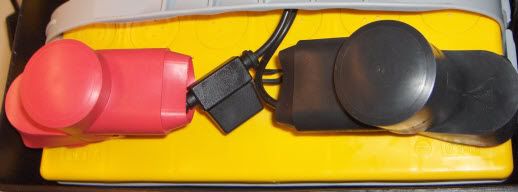
UPDATE: So, as mentioned, I purchased the battery post to marine terminal connectors. I chose the postive connector to allow the 3/8" connector to handle the ring terminal connectors. I had to really tighten this down on the negative post. But it's good and solid.

I found I had to "screw" the terminal connectors on a ways to allow the wing nuts to continue the process. (It was a tight fit). I also purchased a small packet of battery post grease (essentially a colored vaseline) to protect all the battery post and terminal parts.

Then I topped it all off with the battery terminal covers. This is a VERY solid connection. It should not move. It should not have real problems with corrosion. It should not have problems with accidental shorts. I've done what I can to minimize problems.
Image

- - - - - - - - - - - - - - - - - - -

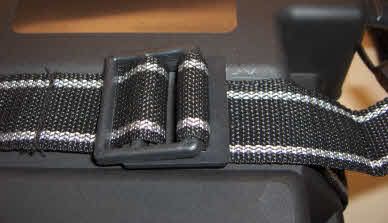
Finally, to tidy up the configuration, close the lid and add the strap for the battery box. This helps make it harder for the lid to be removed without adult supervision. The battery box does include "catches" to help keep the box shut. However, since this will be in an area where little fingers might hunt, an extra method to slow them may help.
Image

Now it's time to look at the inverter. Note the inverter includes both a connector that inserts into an automotive cigarette lighter (also known as a Power Port). Then on the other side is a standard AC plug. Obviously, the outlet will differ by country and the prevailing voltage and outlet design.
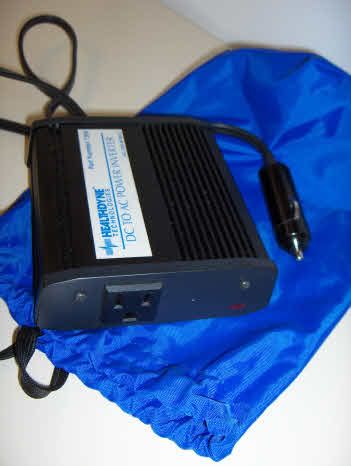
Image

And then we connect it all together. Note that both the inverter and the battery tender are connected and will work at the same time. The advantage is that if we loose power, the battery will continue to operate the inverter and that will provide power to my ASV unit. This will allow me to sleep through any power outages. The current configuration assumes I will not use a heated humidifier. However, if I substitute the modified sine wave inverter for a pure sine wave inverter, I could use my humidifier.
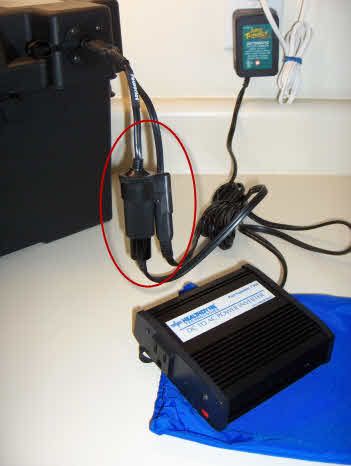
Image

Hope this helps other see how they can put together a battery backup system for their xPAP units.

_________________
Mask: Quattro™ FX Full Face CPAP Mask with Headgear
Additional Comments: User of xPAP therapy for over 20 yrs. Resmed & Respironics ASV units with EEP=9cm-14cm H2O; PSmin=4cm H2O; PSmax=15cm H2O; Max=25cm H2O
Last edited by JohnBFisher on Sun Feb 14, 2010 1:37 pm, edited 8 times in total.
"I get up. I walk. I fall down. Meanwhile, I keep dancing” from Rabbi Hillel
"I wish to paint in such a manner as if I were photographing dreams." from Zdzisław Beksiński

dtsm
Posts: 1097
Joined: Sun Mar 08, 2009 8:34 am
Location: CT

Re: Battery Backup Design

Post by dtsm » Wed Feb 10, 2010 7:14 am

John:

I started the recent UPS thread and want to thank you for the masterpiece that is unfolding before our eyes. Can't wait till it's up on Wiki. One question/suggestion from newbie not familiar with the correct protocol: once it's on the wiki, anyway to create a downloadable pdf file that has the final version?

Thanks again,
dtsm

Fred D
Posts: 49
Joined: Sat Jan 30, 2010 10:27 am
Location: Houston

Re: Battery Backup Design

Post by Fred D » Wed Feb 10, 2010 7:48 am

Great work and explanation, John!! I had been wondering how much power a unit actually used. About 2 1/2 amps max isn't bad.
I feel badly for the folks that are suffering without electricity because of the snowstorm on the East coast and don't have any kind of backup
to use.

Fred

User avatar
reitzell
Posts: 56
Joined: Wed Dec 23, 2009 9:30 pm

Re: Battery Backup Design

Post by reitzell » Wed Feb 10, 2010 8:31 am

WOW! I love it!

_________________
Mask
Additional Comments: smartcodes

User avatar
KatieW
Posts: 1672
Joined: Sun Sep 27, 2009 11:07 am
Location: southern AZ

Re: Battery Backup Design

Post by KatieW » Wed Feb 10, 2010 8:39 am

John, thank you for creating this post. You have put a great deal of thought and time in this, and your instructions are clear and methodical enough that a non-teckie like me can understand, and fearlessly follow them. I appreciate your contributions to this board, you've helped so many of us find our way.

_________________
Mask: Pico Nasal CPAP Mask with Headgear
Additional Comments: Resmed AirCurve 10 ASV and Humidifier, Oscar for Mac
KatieW

User avatar
JohnBFisher
Posts: 3821
Joined: Wed Oct 14, 2009 6:33 am

Re: Battery Backup Design

Post by JohnBFisher » Wed Feb 10, 2010 9:56 am

dtsm wrote:... anyway to create a downloadable pdf file that has the final version? ...
Just remind me when I create the Wiki page. It's easy to create a PDF file. In the past I used CutePDF (the free version) to create a PDF file. It's not fancy. But the price is right!. The link to CutePDF is:

http://www.cutepdf.com/products/cutepdf/Writer.asp

_________________
Mask: Quattro™ FX Full Face CPAP Mask with Headgear
Additional Comments: User of xPAP therapy for over 20 yrs. Resmed & Respironics ASV units with EEP=9cm-14cm H2O; PSmin=4cm H2O; PSmax=15cm H2O; Max=25cm H2O
"I get up. I walk. I fall down. Meanwhile, I keep dancing” from Rabbi Hillel
"I wish to paint in such a manner as if I were photographing dreams." from Zdzisław Beksiński